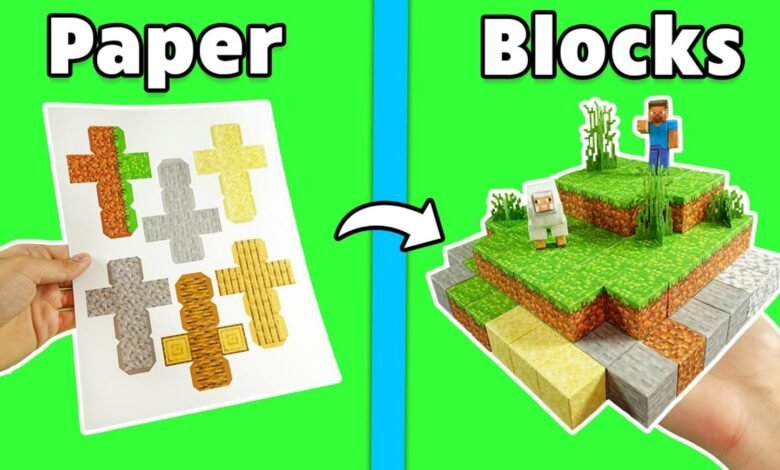
Minecraft has inspired millions of creators to build beyond the boundaries of standard survival worlds. Among gaming communities and classroom coders, learning how to make paper minecraft has become one of the most popular creative projects on the web.
The term covers two distinct, exciting projects: building a playable 2D browser game using block-coding engines, or hand-crafting authentic 3D physical blocks and characters out of printed paper sheets.
This step-by-step guide walks you through both methods. You will learn how to design the game loop, code player physics, utilize every essential paper minecraft recipe, configure multiplayer through a paper minecraft server, and assemble crisp, professional papercraft dioramas at home.
What Is Paper Minecraft?
At its foundation, paper minecraft is a two-dimensional side-scrolling adaptation of the original voxel sandbox game. Rather than rendering three-dimensional depth, the entire play area runs on a two-axis grid (X and Y coordinates), similar to retro platformers like Terraria.
The concept achieved massive popularity through developer Griffpatch on the Scratch platform. His faithful recreation proved that complex mechanics like mining hardness, daylight cycles, tool durability, inventory management, and mob pathfinding could run smoothly inside a web browser without demanding graphics cards.
Today, making your own version teaches essential game development concepts, including array-based world storage, viewport cameras, sprite hitboxes, and procedural generation.
How to Build the Game in Scratch
Developing a digital version is a fantastic way to master programming logic. Instead of placing hundreds of individual sprites on your screen, which slows down your browser, you store your map in data lists and render only what the player sees.
Step 1: Project Architecture and Sprites
Create a new project on the Scratch editor and set up four primary sprites:
- Player Sprite: Contains directional costumes (standing, walking, jumping, mining) and a hidden rectangular collision box.
- Terrain Blocks: Holds individual costume frames for every block type (air, bedrock, stone, dirt, grass, oak wood, leaves, coal ore, iron ore, and water).
- User Interface (HUD): Manages hotbar slots, active selection frames, heart containers, and the crafting screen.
- Game Engine (Pen/Renderer): An invisible manager sprite that handles terrain loops, gravity updates, and world lists.
Step 2: Generating World Lists
A standard Scratch canvas is only 480 pixels wide by 360 pixels high. To create an expansive map that players can explore, store world data in a dedicated List named World_Grid.
- Set a world width (such as 120 blocks) and a world height (such as 40 blocks).
- The total list length equals Width multiplied by Height (4,800 total positions).
- Fill the bottom two rows with Bedrock IDs.
- Fill rows 3 through 22 with Stone IDs, sprinkling random Coal and Iron Ore IDs based on percentage checks.
- Fill rows 23 through 28 with Dirt IDs, and place Grass IDs along the top surface.
- Leave upper rows set to Air (value 0).
To make hills instead of a flat plane, use simple math functions to smoothly shift the grass surface row up or down as your generator loops across the X-axis.
Step 3: Screen Viewport and Camera Scrolling
Create two global variables: Camera_X and Camera_Y.
As your player walks left or right, adjust Camera_X instead of moving the player sprite off-screen. Use a fast rendering loop (set to “run without screen refresh”) that stamps or clones only the blocks whose coordinates sit inside the current camera boundary. Blocks that scroll outside the screen are immediately deleted from the display, keeping your frame rate locked at a smooth 30 frames per second.
Step 4: Player Movement and Physics
Realistic platformer physics rely on separate horizontal and vertical momentum loops:
To create responsive, realistic movement without your character clipping through solid tiles, structure your physics using two simple checks:
- Handling Gravity and Vertical Collision: Apply a constant downward pull to your character’s vertical speed (around -1.2 each frame). Update the character’s vertical position by this velocity value. Whenever the sensor detects contact with a solid block sprite, gently push the player up out of the tile, reset vertical speed to zero, and re-enable jumping.
- Handling Horizontal Momentum and Friction: When the player holds the D key or Right Arrow, increase forward speed by 1.5. When pressing the A key or Left Arrow, decrease speed by -1.5. Apply a friction multiplier (such as multiplying current speed by 0.8) on every frame so movement glides to a natural halt rather than stopping abruptly when keys are released.
This prevents your character from getting stuck inside walls while creating responsive jumping and sprinting controls.
Learning from Community Projects
The fastest way to sharpen your code is to study the work of experienced creators. Exploring community-made paper minecraft scratch projects allows you to inspect working solutions for tricky mechanics like fluid dynamics and dynamic shadows.
When reviewing shared projects:
- Open the project editor and examine custom blocks to see how developers calculate block reach distances.
- Check how inventory arrays transfer held item IDs into the player’s hand costume.
- Take advantage of remix culture. You can test modifications by designing custom mob models, adding original weapon types, or importing your own soundtrack.
Essential Paper Minecraft Recipe Reference
A survival game cannot function without a working crafting grid. Below is a clean, organized reference table detailing how core resources convert into tools, shelter, and survival gear within the game system.
Core Crafting Recipes
| Item Name | Required Materials | Grid Pattern | Primary In-Game Purpose |
|---|---|---|---|
| Wooden Planks | 1x Oak Wood Log | Any 1 slot | Fundamental crafting base for slabs, sticks, and chests |
| Crafting Table | 4x Wooden Planks | 2×2 solid block | Expands your crafting options from 2×2 to a full 3×3 grid |
| Sticks | 2x Wooden Planks | 1×2 vertical column | Used as handles for pickaxes, axes, shovels, and swords |
| Wooden Pickaxe | 3x Planks + 2x Sticks | 3 Planks top row, 2 Sticks down center | Breaks through stone, cobblestone, and surface coal ore |
| Stone Pickaxe | 3x Cobblestone + 2x Sticks | 3 Stone top row, 2 Sticks down center | Required to mine iron ore, lapis lazuli, and copper blocks |
| Furnace | 8x Cobblestone | 3×3 hollow outer square | Smelts raw iron into ingots and cooks food items |
| Torches | 1x Lump of Coal + 1x Stick | Coal placed directly above Stick | Emits light to prevent hostile skeletons and zombies from spawning |
| Storage Chest | 8x Wooden Planks | 3×3 hollow outer square | Stores up to 27 stacks of tools, blocks, and collected items |
| Iron Sword | 2x Iron Ingots + 1x Stick | 2 Ingots vertically above 1 Stick | High-damage melee weapon for combat against hostile mobs |
| Oak Door | 6x Wooden Planks | 2 columns of 3 Planks side-by-side | Secure entrance barrier that prevents monsters from entering shelters |
Coding the Crafting Grid Logic
In your digital game engine, structure your crafting table as a 9-item list (Craft_Slots) with one output slot (Result_Slot). Whenever an item is moved into the grid, run a validation script:
For example, when a player drops an oak log into any single slot of the crafting grid while keeping every other slot empty, the script immediately detects the pattern, populates the output slot with four wooden planks, and sets the item counter accordingly. Once the player clicks and claims the planks, the system subtracts one log from the input slot and transfers the finished items directly into their active inventory.
When the player clicks the output box, remove one item from each occupied crafting slot and transfer the crafted stack directly to the player’s cursor.
Can You Set Up a Paper Minecraft Server?
Gamers frequently ask whether they can run or join a dedicated paper minecraft server to play 2D custom worlds online with friends.
Because standard Scratch projects run inside individual client web browsers, direct local networking does not happen automatically. However, multiplayer functionality is achievable through specific techniques:
1. Multiplayer via Cloud Variables
Scratch features specialized “Cloud Variables” that store numeric data directly on official servers, syncing values across multiple connected players in real time:
- Variable Encoding: Because cloud variables only store numbers, you must encode player names and coordinates into two-digit numeric strings (for example, letter “A” becomes
01, “B” becomes02). - Packet Structure: Pack player details into a single transmission string:
[Player_ID][X_Pos][Y_Pos][Held_Item][Action_State]. - Interpolation: The receiving player decodes this string, updating the position of a secondary ghost character on their personal screen.
2. Standalone Web Engines
For larger multiplayer games with 10 or more concurrent players, community developers often port their project logic into HTML5 frameworks like Phaser, Godot, or custom JavaScript backends using WebSockets. This removes variable length limits and enables persistent world saving, player chats, and custom private rooms.
How to Make Physical 3D Papercraft Minecraft
If you want an engaging offline hobby, making real-life papercraft models is an enjoyable way to assemble desktop dioramas, action figures, and decorative blocks using printed paper nets.
Essential Crafting Tools
- Cardstock Paper: Use 65 lb to 110 lb (176 to 250 gsm) paper. Standard copy paper is too thin and will warp when glue is applied.
- Color Printer: Set your print quality settings to “Best” or “Photo” so pixel textures print sharp without color banding.
- Precision Hobby Knife & Metal Ruler: Ensures razor-sharp cuts along outer boundaries.
- Scoring Stylus: An empty ballpoint pen or bone folder creates crisp fold lines without cutting through the paper.
- Fast-Drying Craft Glue: Tacky glue, glue pens, or narrow 3mm double-sided tape work best. Avoid watery liquid glues that cause paper to wrinkle.
- Self-Healing Cutting Mat: Keeps your workstation protected during precision cutting.
Step-by-Step Assembly: The Classic Dirt & Grass Cube
The standard six-sided cube is the building block for all larger papercraft creations.
- Print Your Net Template: Download a standard grass block net. Always print at 100% scale (avoid “Scale to Fit Page” so tabs line up accurately).
- Score Every Internal Seam: Before cutting out the template, place a metal ruler along every fold line and perimeter tab. Trace firmly with your scoring tool to crease the paper fibers.
- Cut Along the Outer Boundary: Carefully slice along the solid exterior edge of the shape. Do not cut off the small angled glue tabs along the sides.
- Pre-Fold the Creases: Fold every tab and face inward toward the blank side of the cardstock. The scored lines will fold cleanly into crisp 90-degree angles.
- Glue the Vertical Walls: Apply a thin layer of glue to the side tabs, bringing the four vertical walls together to form a square box. Hold the seams firmly for 10 seconds.
- Seal the Base and Lid: Fold the bottom tabs inward, secure the base plate, and close the top grass lid last by gently pressing along the seams. Let the adhesive dry completely.
Assembling Articulated Characters and Mobs
Once you are comfortable assembling basic cubes, you can construct full figures like Steve, Alex, zombies, and creepers:
- Weighted Bases: Drop a steel washer or small coin inside the feet before sealing them shut. This lowers the figure’s center of gravity and keeps tall paper models standing upright.
- Movable Limbs: Pierce a wooden toothpick horizontally through the upper torso where arms join. Slide the arm segments onto the ends and secure them with a drop of glue so the arms can rotate freely.
- Edge Finishing: Use a colored marker that matches the block texture (brown for dirt, gray for stone) and lightly run it along the cut paper edges. This hides white cardstock seams and gives your model a polished, seamless look.
Troubleshooting Common Mistakes
In Digital Coding
- Player Falling Through Floors: This happens when falling speed exceeds block height, skipping collision detection. Always clamp your vertical fall speed to a terminal velocity limit (such as a maximum of -12 pixels per frame).
- Lag and Dropped Frames: Too many clone objects will overload your browser. Never create clones for off-screen blocks; only render the active viewport window.
In Physical Papercraft
- Curling Paper and Wrinkles: Caused by applying too much wet glue. Apply glue sparingly with a toothpick or switch to narrow double-sided tape.
- Asymmetrical, Crooked Cubes: Never fold paper freehand. Always score your seams against a rigid metal ruler before bending the paper.
Frequently Asked Questions
Is it legal to make custom paper versions of Minecraft?
Yes. Mojang’s commercial usage guidelines allow fans to build free, non-commercial games, fan art, and educational projects on platforms like Scratch, provided you do not sell the software, distribute modified game binaries, or claim official endorsement.
What is the ideal paper weight for printing models?
Cardstock between 65 lb and 80 lb (approximately 175 to 215 gsm) offers the best balance. It feeds smoothly through standard desktop inkjet printers while remaining rigid enough to support three-dimensional shapes.
Can Scratch games be converted into desktop programs?
Yes. Tools like TurboWarp Packager allow you to compile Scratch project files directly into standalone Windows (.exe), Mac (.app), or HTML5 files that can be run offline without visiting the Scratch website.
Summary
Learning how to make paper minecraft combines programming logic with hands-on artistic design. Whether you are scripting grid arrays and movement physics inside an interactive coding workspace or folding crisp cardstock blocks to build tabletop dioramas, both approaches deliver a deeply rewarding creative experience.
Pick your project: open up an empty coding editor to build your custom 2D terrain engine, or grab cardstock, scissors, and ruler to assemble your first real-world grass block today.